I use Powershell a lot to do reporting on various things in my environment and one of the most useful is Active Directory. I went to a class once hosted by a company that makes an AD tool and the presenter actually asked in the class if anyone knew how to do a specific lookup with PS and of course no one did. Well, I took that as a challenge because I had that software just as long as it took me to figure that out on my own. That story being told, below we are going to step through a very basic report getting some AD data and formatting it in a table which we are going to add into an email. A little Powershell with a little HTML, sounds like a nerd party!
For our data on this we are just going to keep it simple and use Powershell with the ActiveDirectory module to query and get all the accounts that have been created within the last month. This would be something that could come in handy if you had a few admins in your department and wanted to audit when accounts are being created.
For this we are going to be using my new favorite editor for Powershell, Visual Studio Code, which is FREE from Microsoft and you can pickup here. Along with that, as always, I am NOT a programmer and there are better ways to do these things and cleaner ways of coding it, but this is how I do it and it works for me and hopefully helps you out as well.
Our first step in this whole thing is to get some data to work with, remember that we are just working with an example of a script so you may have to tweak your times etc to get data. In the real world you may have a blank report.

All our data is going to come from these 2 lines, Im sure it could have been one line but I like to store the date info as a variable, just habit I guess. The second line there is the key though, there is where we query AD for all users that have a created date “Greater Than” the date one month ago. Along with that we select a few properties that we want to display and that is seriously it.
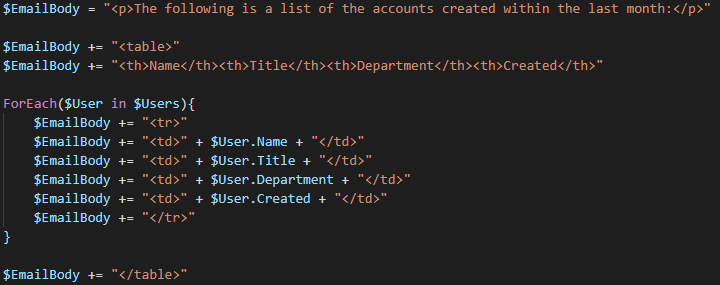
With that done its time to construct the email and that is where we will put some HTML coding into play. To make the email body the idea is to keep adding info to the variable so that when we call it in the Send-Message its all right there.

As you can see we start with a variable, $EmailBody, and add some HTML to it and then just keep adding to the end over and over. The important thing here, at least in my eyes, is to not be afraid to spread this out, your HTML will be way easier if you can keep it somewhat laid out the same way HTML is normally laid out. As you can see above, we use a ForEach loop to step through the data and create a new table row each time.

At this point the only thing we are missing is the actual sending of the report using the Send-MailMessage command. The only thing to remember here is that we need to include the “-BodyAsHTML” switch on the command to make sure it gets formatted correctly.
This is just a simple example of this type of report shortly, because a lot of this code can be resused, I will go over a more complicated type of report pulling data from a couple different commands. The data will be put together in a new object and then create a table with criteria to highlight. Snazzy huh…