Create a GUI for a PowerShell Script
If you are anything like me, you have found PowerShell one day and refuse to let anyone take it from you. I am a big fan of re-usability and for me that is what PowerShell brings to the party, the ability to create a script for something and then use it again and again. The first thing I used if for was to export mailboxes from Exchange 2007. I kept the command in a text file and would make a simple edit to it when I needed it and paste it in a PowerShell window and relaxed while it did the work for me. That’s how the obsession started, now a days I use it to make (what appear to be) full on applications to make my technical life easier. I am NOT a programmer, I just dabble in a little scripting to make my administration easier.
Let me say before getting to much into this, I’m sure there are other ways to do this, in fact I have done this other ways but I happen to like this way (at the moment). So if you are already doing this kind of thing another way and don’t like this one, no worries. With that being knocked out of the way, lets get started.
Ev erything we need for this method is FREE and actually for the most part is probably already installed on your Windows machine. The one thing, and of course the most important thing when it comes to the GUI, we will need to grab is a copy of Visual Studio, which you can find here. Just the defaults will work when it comes to what to install, we don’t need anything too special.
Once Visual Studio is installed, give it a start and what you are going to want to use is a WPF Application. This will let us make an interface to an application then copy the XAML from it to our ISE (or whatever your favorite PowerShell editor is) and build our script code around it. Since we are just learning this I have just named it “Test” so it has some kind of a name. Now you should be faced with the Visual Studio editor…don’t be overwhelmed. We are primarily going to be concerned with 3 sections of it, the Toolbox, Design and XAML.

 Make sure the toolbox is expanded to make things even easier and we are only going to add 3 controls on to this so we can learn and see just how easy it is. Somewhere on that blank application drag a Textbox, a Button and a Label.
You can see on the screen that all 3 controls are there and as you dropped them on all the useful properties, or at least most of them, appeared in that XAML section below the design. That is the code that we are going to “borrow” from Visual Studio to use in our PowerShell. To make our lives just a little bit easierwhat I like to do before I grab that code is I like to edit each of the controls that are in use and just give them a name. To do that, click once on the control then in the properties box on the right, type in a name. I was in college back in the VB6 days so I still now name my controls similar to the way it was done then so I ended up with txtName, btnClickMe, and lblMessage. Don’t judge me for living in the past!
At this point I am happy with the form but where most might copy the XAML and build their script, I don’t. The way I was taught to do things was to make sure things are reusable, and since we are going to have to put some specific code in PowerShell so we have a working GUI I tend too get that ready first. Personally I find it easier to keep script files with code that I can reuse, I just open it in ISE, copy what I need from the old file and paste it into what I am working on now. So, of course I keep all the surrounding code in a template file.
So I already have a session of Powershell ISE open with my template file so I can steal the base code for my script and get it into the new script with the GUI. Again, you might not be an ISE fan, this portion can be done with whatever editor you like to work with, in another post I will be using PowerGUI to show you another handy trick, its all about what you want to use here.

Using the code from that template I get my new script running.
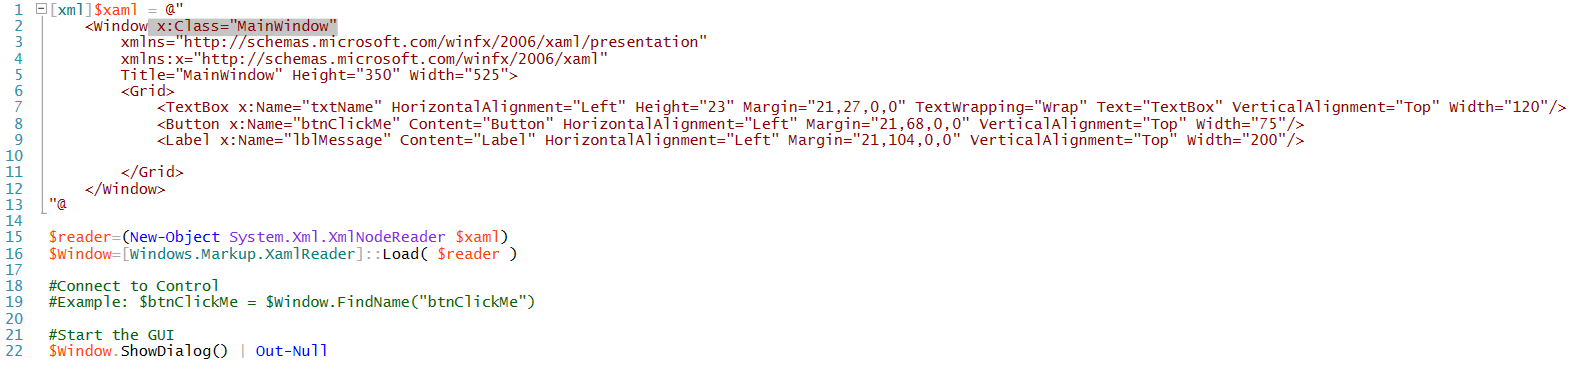
Once you have that starter code in a fresh script, go back to Visual Studio and grab a copy of that XAML and come back to ISE. In ISE you are going to want to paste that copied code starting at line 2 so its between the @” and “@. Once you paste it in, you are almost to a point where you can actually run the script (it won’t do anything but show your form but you will know the form works).
 There is only one issue, see on line 2 where it says “x:Class=’MainWindow” (if you tinkered with your properties before moving yours may have a different name there, but close enough)? Well you don’t want that there, highlight it and delete it. Go ahead and run the script to see your form, I’ll wait……..nice huh.
A little description of what we have here then we will add a little code to finish the script off.
Line 15 – Here $reader gets assigned the code that deals with creating the new object that will be the form and read the xaml
Line 16 – Here we assign the $Window variable which is what we will use to actually call the form
Line 22 – This actually calls your form, known as “$Window” which is how we set it in Line 16
 Just one more quick step before we can get to our script, we have to connect these controls to something so that we can use them in the script, if we don’t they will just sit on the screen and do nothing, kind of like they are doing now. Take note of Lines 19-21 at the right. Here we set a PowerShell variable to the same name we gave the control in the XAML (really you can assign whatever you like, if I assigned something else it would confuse me, so I don’t).
 All this script is going to do is take a name typed into the textbox, and when a user clicks the button the form will display a message to that user. All this can be done in these events directly, as the form loads, as the button is clicked, but for the sake of seeing how I have found it to work best I am going to use a function for the click of the button. First though, our form is messy, the textbox shouldn’t say “Text Box”, the Label for the message should be blank until we use it and the Button is supposed to say “Click Me”. So lets handle this first…
 Not too bad so far is it? Since we have a button involved here we are going to have to make a way for it to do something when its clicked. No problem simply adding an Add_Click({}) for that, or any other button will handle that. With that line all you will need to do is add whatever you want the button to do in between those {}. In our case we are going to make a function called “DisplayMessage” next so if you want to can add that to the button now.
Now, all the way to the top we are going to add a function. Why at the top? Well I have had it happen many times where I put a function at the bottom of the script and it doesn’t get read, so when my script calls to it, it’s not there. When I put the function at the top though, if the form gets displayed then I know that the code has already run through the function and its good to go. Here below is the ENTIRE script, including the function at the top.

 That wasn’t too hard, with all of 36 lines of code, some of them blank, we have made a simple GUI for a PowerShell script so now we can have a little flexibility with it. I have found that is really helpful when you are not the only admin in a company and you may have a script that’s really helpful but requires a little input. Not everyone is a PowerShell fan but if you make a quick simple front end, they don’t have to be, they just have to enter what they need and let your script behind it do the rest. Or even if its just you in the department, take a few extra minutes to make a GUI for a script you do all the time and save yourself having to open it and edit it each time you want to use it.
 erything we need for this method is FREE and actually for the most part is probably already installed on your Windows machine. The one thing, and of course the most important thing when it comes to the GUI, we will need to grab is a copy of Visual Studio, which you can find
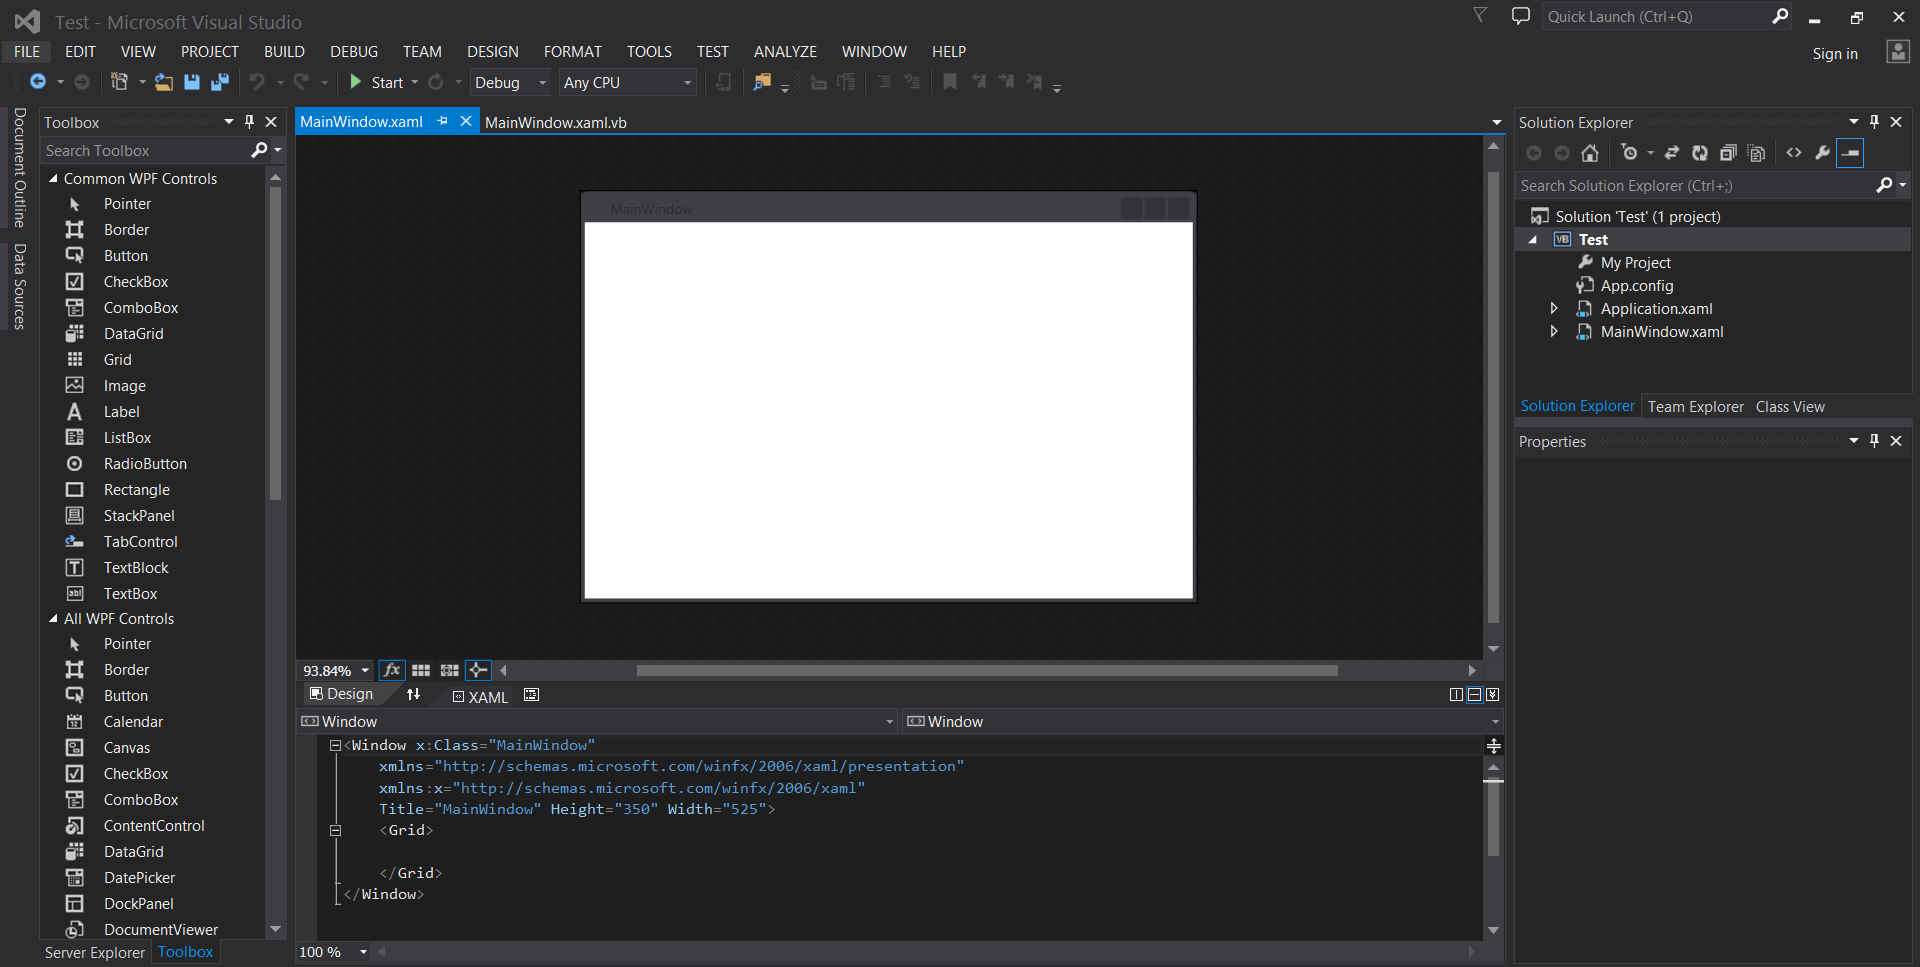
 Make sure the toolbox is expanded to make things even easier and we are only going to add 3 controls on to this so we can learn and see just how easy it is. Somewhere on that blank application drag a Textbox, a Button and a Label.
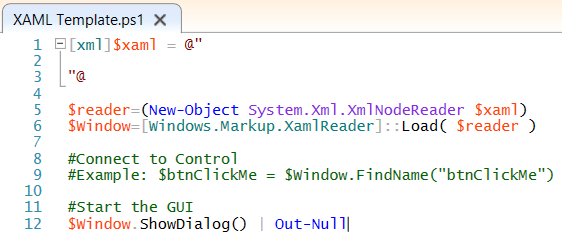

 All this script is going to do is take a name typed into the textbox, and when a user clicks the button the form will display a message to that user. All this can be done in these events directly, as the form loads, as the button is clicked, but for the sake of seeing how I have found it to work best I am going to use a function for the click of the button. First though, our form is messy, the textbox shouldn’t say “Text Box”, the Label for the message should be blank until we use it and the Button is supposed to say “Click Me”. So lets handle this first…
 Not too bad so far is it? Since we have a button involved here we are going to have to make a way for it to do something when its clicked. No problem simply adding an Add_Click({}) for that, or any other button will handle that. With that line all you will need to do is add whatever you want the button to do in between those {}. In our case we are going to make a function called “DisplayMessage” next so if you want to can add that to the button now.
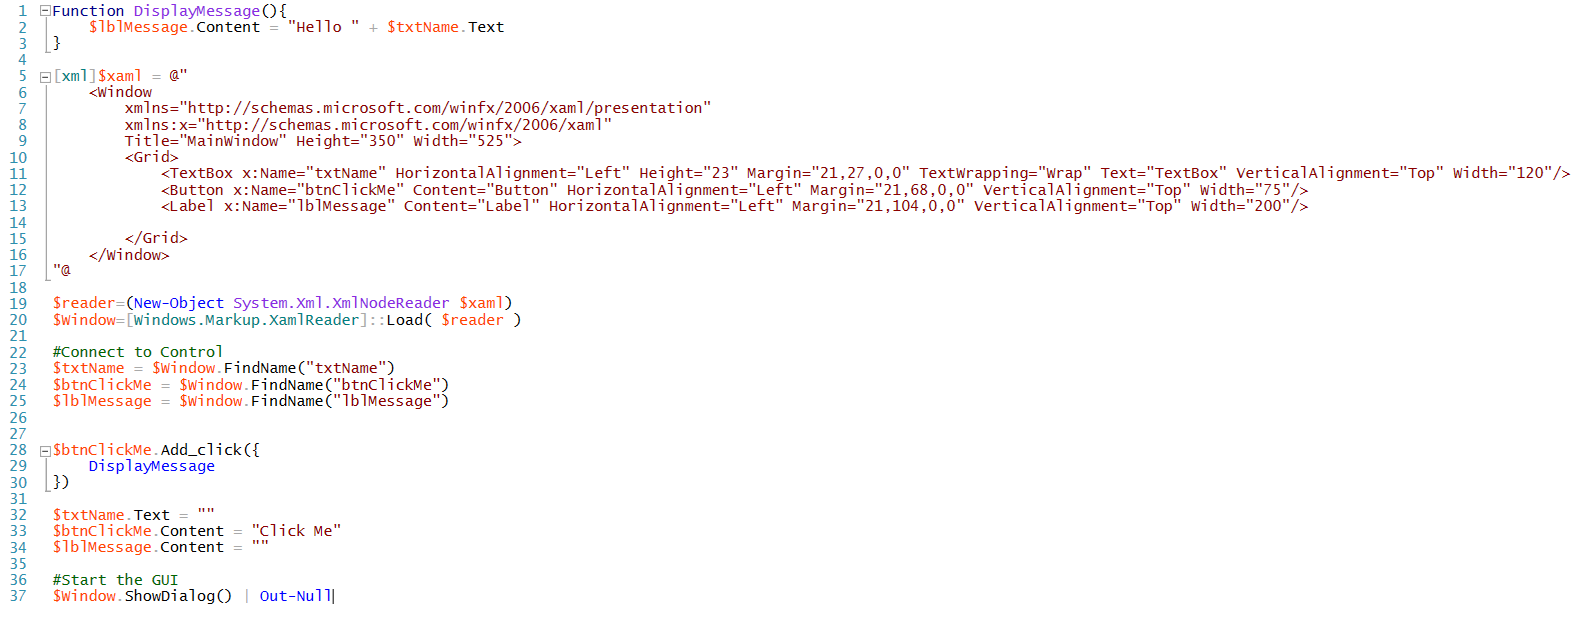
 That wasn’t too hard, with all of 36 lines of code, some of them blank, we have made a simple GUI for a PowerShell script so now we can have a little flexibility with it. I have found that is really helpful when you are not the only admin in a company and you may have a script that’s really helpful but requires a little input. Not everyone is a PowerShell fan but if you make a quick simple front end, they don’t have to be, they just have to enter what they need and let your script behind it do the rest. Or even if its just you in the department, take a few extra minutes to make a GUI for a script you do all the time and save yourself having to open it and edit it each time you want to use it.